Showing posts with label Ellen. Show all posts

Saturday, January 25, 2014

Ellen's Vintage Fashion Inspiration for 2014

Just like Emily mentioned in her fashion inspiration post, every year around this time I get incredibly antsy for new projects, inspiration, and new fashion! Today I'm going to share with you some of my favorite pieces, looks, and styles that will certainly inspire me for the year to come.

This is a 1922 House of Lanvin French dress housed in the Met's Fashion Collection. And I am in love. The combination of contrasting fabrics and colors is the first thing that catches my eye. It looks soft and comfortable, but still airy enough (especially with the coral cut outs) to be the perfect dress for a warm summer day! I love how the coral lines the neck and arm and creates a fun, geometric pattern to define the rest of the dress.

The cut of this dress is great too - and in fairly typical 1920s tradition. It looks loose enough to be incredibly comfortable, but still with a little definition around the waist and bust. And I can't get over that full skirt, either! Unfortunately this is the only photograph available on the Met's website, but I would absolutely love to get a closer look at the front of this piece (and not to mention all the detail!).


Another dress I have been fawning over lately is this beautiful silk 1930s dress that is available for sale on Etsy. I think the cut of this dress has to be my favorite part - the fit and flare is incredibly flattering. The pleating above the bust is an excellent addition as well, it adds just the right amount of visual interest to the top of the dress. 

There isn't too much information available on this dress. It's made of a slubbed silk which makes it fairly light and comfortable - and brings out the brilliant red coloring! This dress would be incredibly easy to add into a modern wardrobe as well. It's a style that is copied quite often, but I think it is executed to a T here!


Here we have a pair of 1930s metallic gold dancing shoes (also available on Etsy!). If only my feet were a little smaller they would be mine! Unfortunately, I don't know exactly when in the 30s these were made and worn (I'm not as much of a modern history expert as Emily is!), but they sure are adorable.

They have just the right amount of heel and hold your foot in well enough to look amazingly comfortable. But I love the metallic details and the woven cage around the toes! It's a different approach to the usually closed toe t-strap heel that I feel works really well.

I could just imagine having a fantastic time dancing in these, they are definitely going to be my inspiration while I am looking to buy new heels this season!

Lastly is this robin's egg blue, fur trimmed coat from the 1960s (that is also for sale!). I don't even know where to start with this dress! It's a wool blend with genuine fur cuffs and collar and the most adorable purple buttons. I love the lining along the front and can only imagine it to be a very flattering (and warm!) coat when it is worn.

I think the color of this coat is what really gets me! I think the powder blue mixed with the light purple buttons and light grey fur that has some dark highlights is the perfect mix of pastel and darker natural fur colors.

Although coats are a hard thing to copy, this is definitely my go-to for inspiration. I try to look for jackets in eye-catching colors with nice details without forgetting the warmth factor! This coat hits all those marks and I am incredibly jealous of whomever snatches it up!

I hope you've enjoyed taking a look at some of my vintage fashion inspiration - and that it may have inspired you! Do we share any of the same tastes?

Ellen

Monday, January 20, 2014

Vintage Inspired Crafting: The Embroidered Pocket

As an amateur (and I mean really amateur!) student of sewing, I decided to focus on improving my needle skills in the new year. So, I decided one of my first projects of the year would be to create a brief tutorial on embroidery from one student to another!


I chose to do simple, 1920s Deco inspired pocket embroidery designs mostly because as a first time embroider-er I didn't want to take on too large of a task, get overwhelmed, and ignore it for the next two months (something that has definitely happened in the past!).


First thing's first - supplies! You will need: a sweater to embroider, a pen or thin marker, craft or embroidery thread, a needle with a large eye, a hardcover book, and a pattern! My thread is actually more fuschia than bright red in real life (no Christmas colors here!).


Step 2: choose your pattern! My pattern came from this 1920s Deco dress trim. I fell in love with it because a. it's simple (most important!) b. it's vintage, but still totally workable into modern fashion and c. it's so pretty!


Here's a before photo of my sweater. I love the mustard-y color and the scoop neck design! It's one of those pieces I used to wear almost every day but has sadly fallen out of my fashion routine. I'm hoping (now that I've sharpened my embroidery skills!) to add some more vintage inspired patterns along the neckline and buttons a little later!


Step 3: Draw a freehand mock up of your design onto the intended area.

This is the simplest way to transfer your pattern, if you're looking for a more detailed and "perfect" result, feel free to leave a comment and I'd be more than happy to tell you the extra transfer steps!


 Step 4: Stretch your sweater across a hardcover book. This is in place of an embroidery hoop (if you have one of those, use it!). It'll help keep the sweater taut as you work on your design and make your life a whole lot easier!


Step 5: Sew! To be perfectly honest, my first pocket took a very long time. It was challenging working so repetitively and keeping to the pattern, but I did it! The entire pattern was done using the simplest embroidery method that I know (looping the thread) which I hope is visible in the above photographs. It also turned out that keeping a similar method throughout the pattern made it look significantly more put together! Make sure you remember to knot your thread firmly in the back so your embroidery doesn't come undone in the wash.


And here is the final product! My first pocket definitely turned out a bit nicer than my second pocket, but such is DIY. I hope that my brief tutorial was helpful and (maybe!) inspired another amateur seamstress to try their hand at embroidery!

Ellen


Thursday, January 16, 2014

Style: Vintage Scarves and Seven Historical Ways to Wear Them

Today I am so very excited to share a post on vintage scarves with you! Scarves (both vintage and modern) are one of my favorite accessories, and I have an embarrassingly large collection.

Here is a little preview of just the vintage scarves I have in my collection. These mostly range from the 50s-70s. As you can tell, the majority of the scarves are silk and they are mostly all in little squares. I absolutely adore the range in patterns and the incredibly vibrant colors! The reds, yellows, greens, and oranges are eye-catchingly bright, plus they bring a ton of visual interest into whatever outfit they're paired with. The scarves with more traditional floral motifs even stray from that with their variety and color. Not to mention the geometric prints! The boldness of these prints make them a perfect addition to any outfit!


Now that I'm done blabbering about myself, here are seven ways to fashion scarves as seen in some of my favorite vintage eras!


1. The 1915 Front Knot:

This one is fairly simple: wrap your scarf under a collar and knot it in front of your blouse. This style comes from a brochure dating to 1915 that depicts a typical outfit for a female tennis player. I adore how her scarf ties under her collar and adds just the right amount of extra detail to her simple outfit!


2. The 1920s Head Wrap:

Fold your scarf into a triangle and then fold flat to your desired width. Wrap it around your head with both of your ends meeting under an ear and tie loosely! This is definitely a fairly scandalous image for the 1920s and unfortunately (even after 40 minutes of super internet sleuthing!) I couldn't find a solid source. I think this would look particularly nice with some sort of up do as is pictured, and is definitely a trend we don't see often enough!


This look simply requires a brooch (or hair pin!) to tie your scarf under your neck. It's a great way to bring in two different personal touches and add some color to your outfit! This photograph is showing a handmade crocheted scarf from an instructional booklet.


4. The 1937 Bow:

Pictured is Jean Muir with her scarf simply tied around her neck. The choice to spread out the extra scarf over her shoulders (rather than in front of her blouse) almost makes it resemble a bow! This scarf style is fantastic and is something I haven't seen before. This is a promotional photograph of Jean Muir published by First National Portrait (and it's for sale on eBay!).

5. The 1943 Rosie the Riveter:

Here is an example of the "Rosie the Riveter" (or Wendy the Welder!) scarf look. This one is also pretty simple: First fold your scarf into a triangle. Then wrap it around your head and over your ears and knot it a few inches back from your forehead. After you knot the scarf, pull the remaining triangle point under the knot and wrap it around - tucking it under so it stays in place! This is a classic way to keep hair out of your face while you're working and represents an important time for women!


6. The 1955 Sleep Cap:
I've included this sleep cap (as modeled by the one and only Lucille Ball) to show a variation in the "Rosie the Riveter" head scarf style (even though the sleep cap has been around for longer than the Rosie head scarf!). Here, Lucy has pushed the scarf behind her ears and knotted it about halfway back on her head with a little bow in order to show off her hairstyle!


7. The 1960s Jackie O:

Jackie Kennedy has taken the simple and turned it iconic. Simply fold your scarf into a triangle and wrap over your head, tying it loosely under your chin! This look is perfect for a windy fall day or just looking super fly in your convertible (I wish!).


I hope some of these ideas inspire you to play with your vintage scarves a bit differently than we usually see! Do you have any other styling tips for vintage scarves?

Ellen

Sunday, January 12, 2014

Crafting: Make Your Own Vintage Inspired Stamps


Seven Magpies has certainly inspired me to actually get to work on my New Year's Resolutions! I am excited to share with you a how-to for my very first vintage inspired rubber stamp (and how I used it to make some cards)!


Rubber stamps are incredibly easy to make, this one took me about 15 minutes to create!


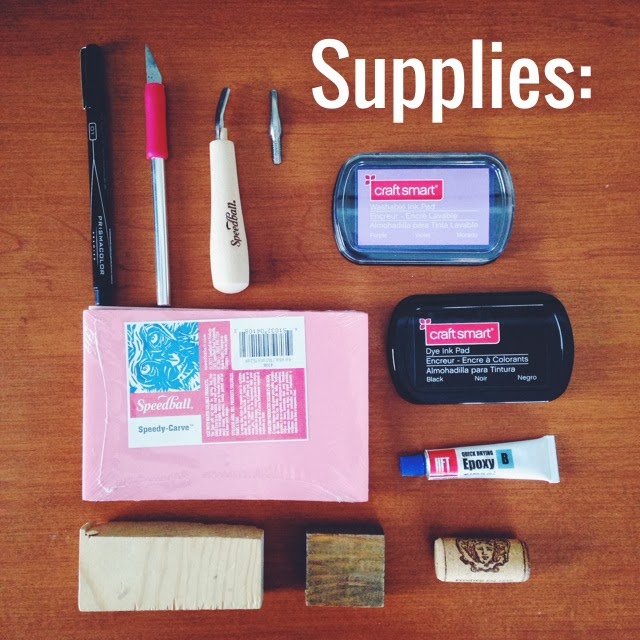
Your supplies:
  • Pen
  • Exacto Knife
  • Burens/Buren Tips
  • Rubber
  • Wood Blocks or Cork
  • Wood Glue (The only glue I had available was Epoxy, which didn't work too well with the rubber)
  • Ink
Note: I decided to buy a small starter supply from Speedball available here because it includes rubber, a nice wooden handle with two buren heads, and a piece of tracing paper for more intricate designs. You can certainly also find these supplies at your local craft store!
 
I decided to loosely base (and simplify) my stamp off of this vintage print. This is a 1920s-inspired 1960s-made blouse available on Etsy that I think is pretty adorable!

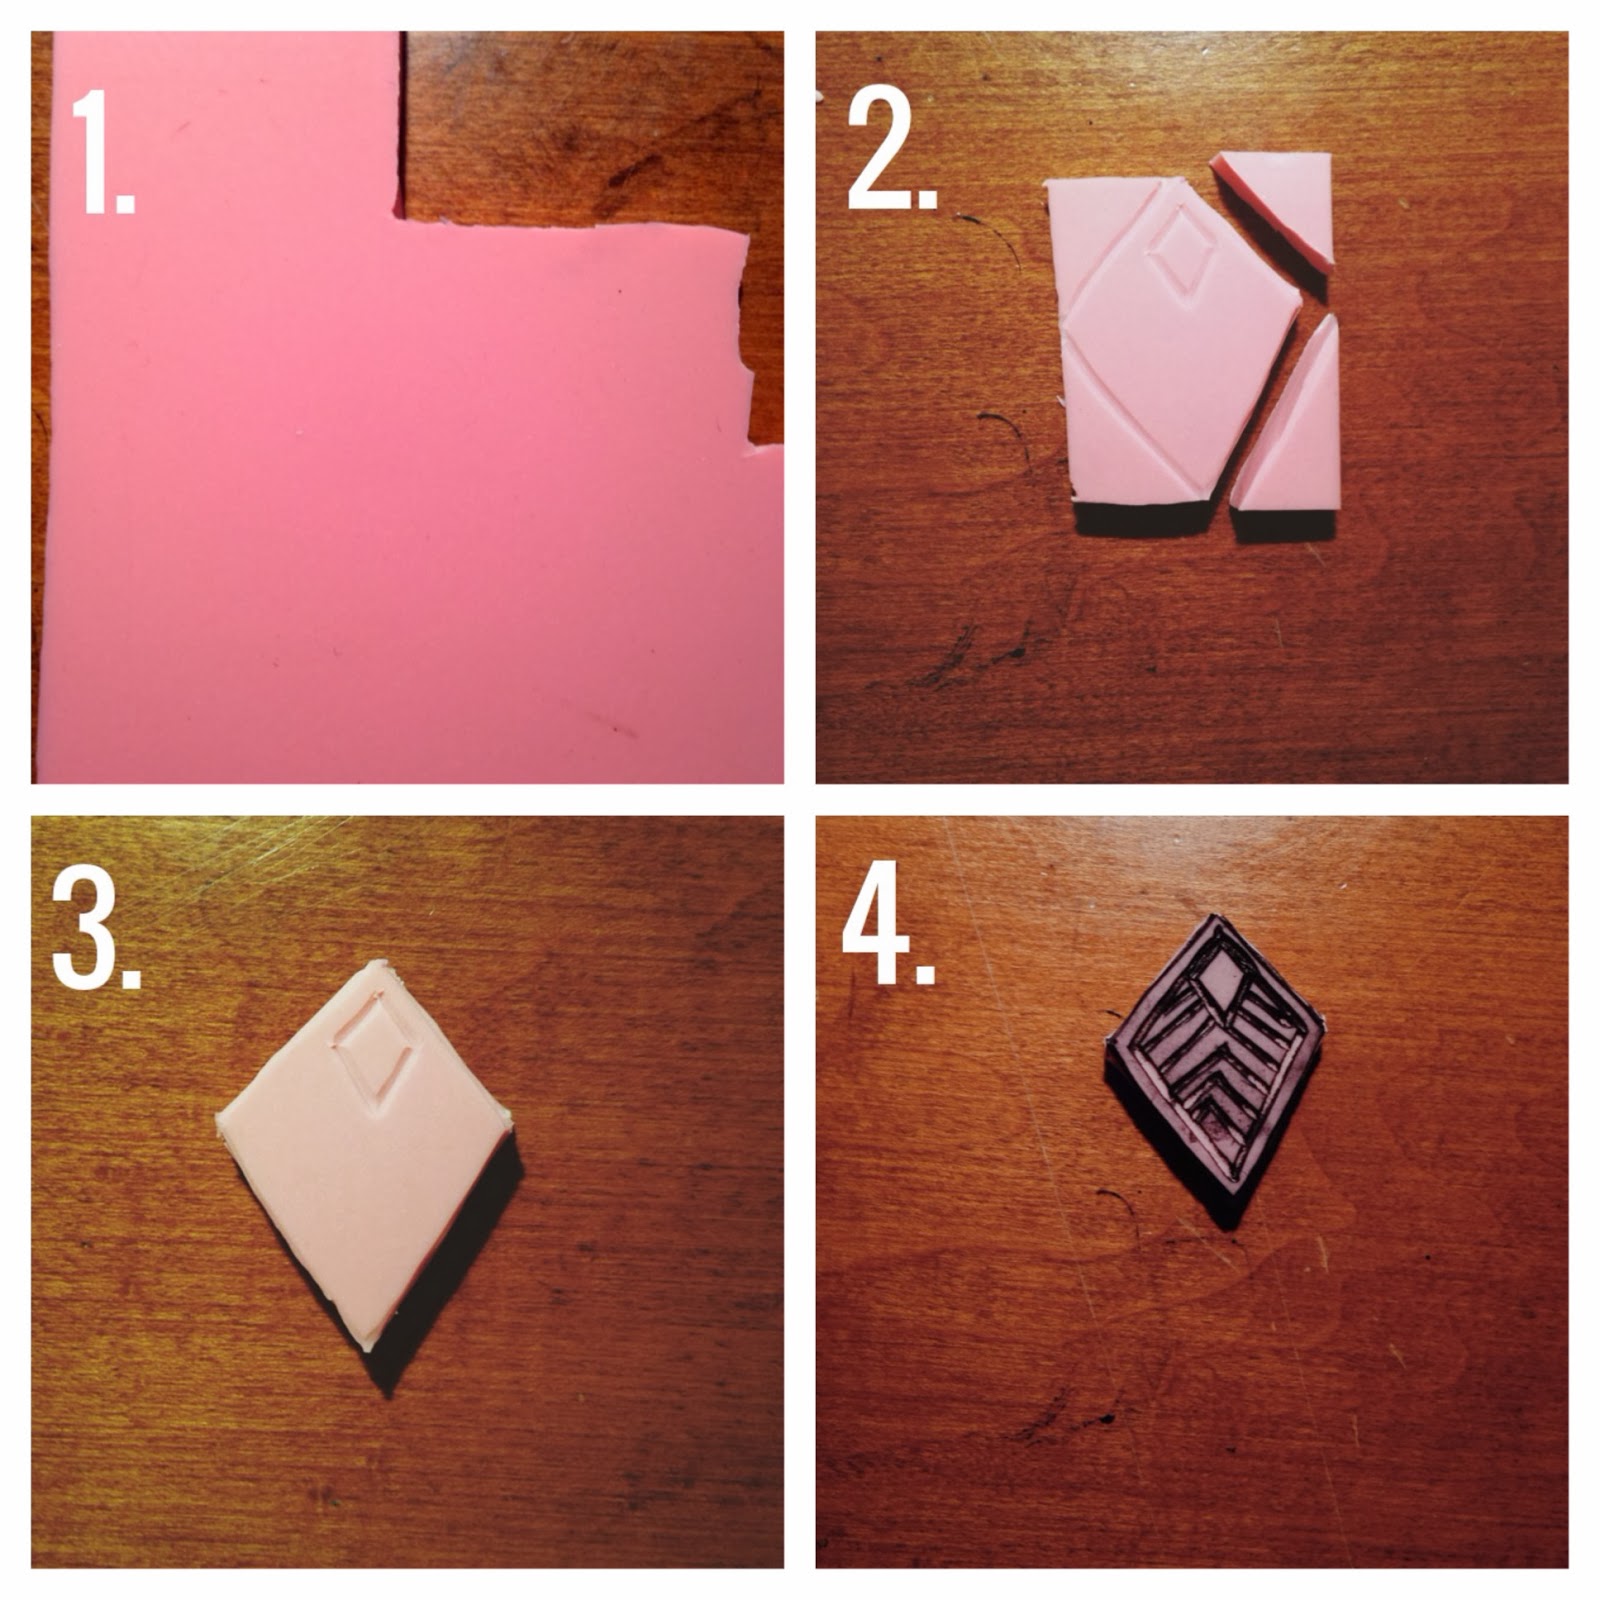
First, cut a square from your block of rubber for easier handling with your Exacto knife. With your cutter tip, engrave the basic design of your piece. Then, use your Exacto knife to cut along the outside of your design (this way there's no messy outline when you stamp it!). Finally, draw the detail of your design with a pencil on your piece of rubber and cut around these lines. Test it out to see if you need to correct any errors!


Next up you will want to pick out a woodblock or cork that matches the size of your design and use your wood glue to attach it to the back. This saves you from getting ink all over your hands when you dip the stamp into ink!


And you're done! I hope this tutorial was helpful and you feel inspired to create your own vintage inspired stamps. They're great for making art, cards, or adding personal touches to just about anything!


Tip: Use the edges you cut off from your main design as more stamps! I loved incorporating these mismatching triangles into designs.


Okay... I may have had way too much fun making stamps. Here are a few more examples I made - they're so easy!


Ellen

Thursday, January 9, 2014

Vintage Decor: A Headboard of Sorts

I have entirely too many vintage items in my possession, so, to combat my habit, I am constantly looking for new ways to incorporate my pieces into things I actually am in need of. 
 
One example of this is a vintage (or vintage inspired?) Japanese wall screen I found a few years ago at a consignment store. (I apologize for the photo quality; this thing is impossible to shoot!) Unfortunately, like some of my other items, its origins are completely unknown. I have no idea how vintage this piece is or if it's simply vintage-inspired! The wall screen is in four separate pieces and about 4.5 ft wide by 3 ft tall and 1 inch deep! It's made of wood and incredibly heavy - this and its areas of wear point to it being at least a little bit aged! I feel that I have to mention the fantastic pros for shopping at consignment stores; I got this entire screen for 60 bucks (that's only $15 per board!)! It was a total steal.

When I got it home I of course had absolutely no idea what to do with it, but, after a good talk with my design consultant (my mom) we decided to put it to use as a makeshift headboard. This is a great solution for me especially because I've never been a fan of the traditional headboard (a completely irrational dislike, might I add!). Although the screen is definitely placed too high to be considered a real headboard, it serves its purpose and is the perfect substitute for my anti-headboard self!


Substituting a giant piece of art for a headboard makes all too much sense to me as a student of art history. It adds a ton of extra visual interest and is the perfect statement piece! 

The wall screen has some great details: each colored part is first carved into the wood piece and then painted. The reflective faux gold foil background grabs your eye and pulls you in to the beautifully coupled birds. There are intricate metal tabs (barely visible in the photo) at the top of each board. It's all really quite stunning!

Pieces like this are what I feel really make vintage design work. Do you have any vintage (or vintage inspired) pieces that you've used in different ways than expected?

-Ellen


Monday, January 6, 2014

Not So Vintage Crafting: A Dinosaur Succulent Planter

I first saw these plastic dinosaur planters on Etsy and immediately fell in love. In the typical fashion of an avid crafter and DIYer, I decided that it would be well worth my time to make a pair myself! I enjoy adding to the never ending supply of succulents to my home (and the homes of my friends) because they are almost impossible to kill and are adorable to boot!

Supplies needed: 
  • A hollow plastic dinosaur toy (try squeezing the back just to make sure!)
  • A knife
  • Gold spray paint
  • Small rocks
  • A succulent planter (small or large depending on how many projects you will use it for)
I completed this project in two periods to allow the paint enough time to dry; overall it took about 30 minutes to make two dinosaurs.

 Step 1: Cut a rectangle (or square) into the back of your dinosaur. I'll admit, this was definitely the most difficult part of the project (I even had to enlist the help of my mom)! The dinosaurs I bought ended up being fairly high quality and had about a quarter inch of thick plastic to get through. 


The cuts don't have to be perfect; it will be spray painted and filled with plants later so any mistakes will be hardly visible!


Step 2: Spray paint your dinosaurs with a metallic gold spray paint.


My kitty loved them!


Step 3: Add rocks to the inside of your dinosaur. Not only will this weigh it down and fill extra space, but it will also help the water drain better when you water the plant later!


Step 4: Take a rooted succulent from your planter and put it, along with its dirt, into the dinosaur's back. I also put a few more rocks on top of the dirt for looks! 


And you're done!

These guys hardly look like they're made of plastic once you're finished with them! Have you planted anything lately?

Ellen


Saturday, January 4, 2014

Paper Ephemera: A Vintage Wintery Print

Today I wanted to share with you one of my favorite vintage prints in my collection! This was printed in 1946 and depicts Central Park ice skaters from 1862. It's the perfect wintery inspiration scene for all the snow we've been getting here in Michigan lately! Here's a detail with the publishing date and place, and a hardly readable description stating what the piece depicts.


I love the typography used by the publisher, the block letters make this perfectly adorable. Couldn't you just imagine living in 1946 and dreaming about the days it was 1862? It's almost the same difference as us dreaming about the days it was 1946!

The details in this print are fantastic. Overall it has a fairly soft look - almost like a watercolor wash was put over the ink! There has definitely been some careful attention paid to the clothing and people in the print, too. I love the little hat worn by the man in the yellow jacket and look at that woman being pushed in a sleigh-type chair! There are also quite a few people that have fallen flat on their butts - little details that give the print a very relaxed and fun feel.

The whimsical wintery details make this print even more enjoyable in my eyes - we get to see a 1940s perception of the perfectly terrible ice skaters of the 1860s.


Prints like these are some of my favorite vintage items, I love collecting and displaying them everywhere. Even though the wear and tear on this print is pretty visible, I think that it gives it a little extra character!

Do you have any vintage prints that look even further back in time?

Ellen